- Published on
PocketChat
- Authors

- Name
- Mohammad Kanaan
Overview
In this article we will explore how to build a real-time chat application with PocketBase including authentication and real-time subscriptions.
Setup
First, we have to set up PocketBase, it's really easy. Check this article for all the set up required, PocketBase Setup.
Data Modeling
Next, we'll need to model our data, that's really easy to do.
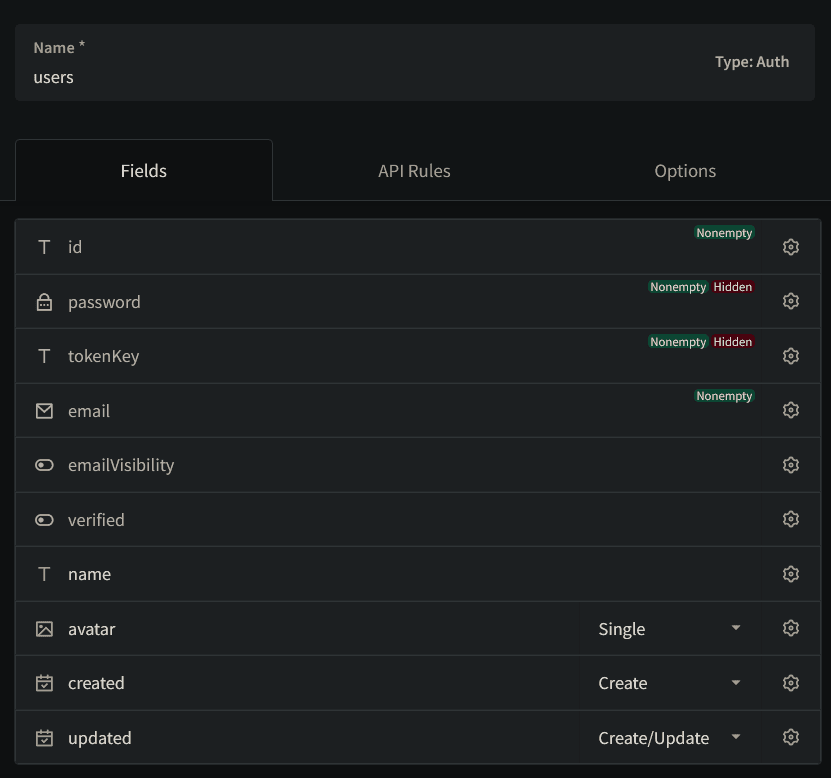
Users
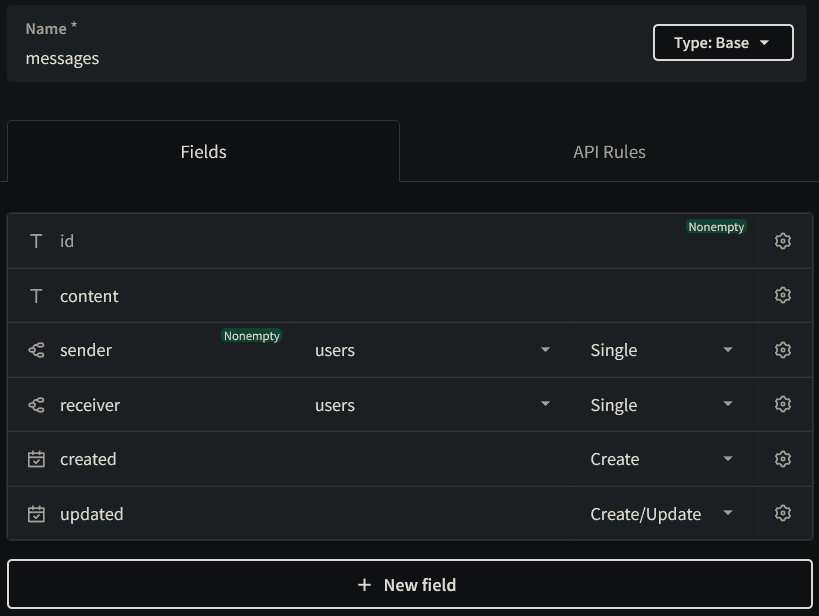
Messages
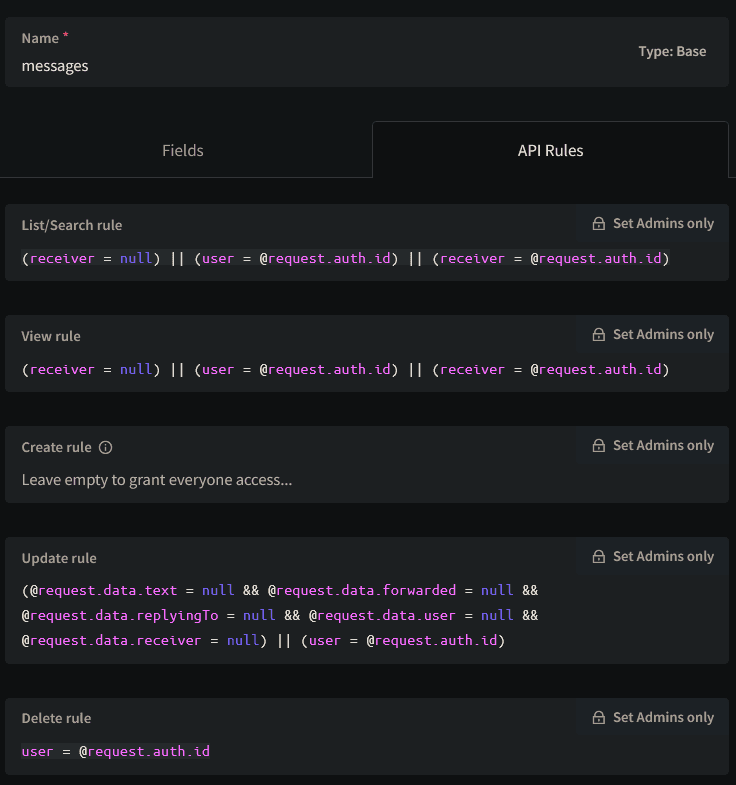
API Rules
For this collection, we'll need to add some API rules to only allow users to read messages that are either public or sent to them. We can and will implement this logic on the frontend as well, but it is always critical that the server doesn't give up information willingly.
For List/Search and View, apply the following rule:
(receiver = null) || (user = @request.auth.id) || (receiver = @request.auth.id)
For Update rule, apply the following rule:
(@request.data.text = null && @request.data.forwarded = null && @request.data.replyingTo = null && @request.data.user = null && @request.data.receiver = null) || (user = @request.auth.id)
And for the Delete rule, apply the following rule:
user = @request.auth.id
Frontend
As per the tags, this project is built with React Native and Expo. It is critical that you do the next step, if you don't, the real-time subscriptions won't work.
Types
First and foremost, I'd like to initialize the types, which is completely optional, but very necessary in my books. This has an extendable BaseRecord and our two collections.
// Type definition for base record model
export type BaseRecord = {
  id: string;
  created: string;
  updated: string;
  expand?: {
    [key: string]: any;
  };
};

export interface User extends BaseRecord {
  email: string;
  verified: boolean;
  avatar?: string;
  name?: string;
}

// Example message type extending base record
export interface Message extends BaseRecord {
  content: string;
  sender: string; // The ID of the user
  receiver?: string; // The ID of the receiver
  expand?: {
    sender?: User; // Make user optional in expand
    receiver?: User; // Make receiver optional in expand
  };
}
Set Up EventSource
Install react-native-sse to your project. I'm using pnpm so I'll be running the following command:
pnpx expo add react-native-sse
or if you're not using expo:
pnpm add react-native-sse
And then initialize the event source using the following code, it must be included in pocketbase.ts
// @ts-ignore
global.EventSource = eventsource;
Set Up pocketbase.ts
This is the main file where we'll connect backend to frontend. It includes typing collections which is very convenient, and it also includes useAuth/login/register/logout functions to use throughout the app.
import { Message, MessageReaction, User } from "@/types";
import PocketBase, { RecordAuthResponse, RecordService } from "pocketbase";
import eventsource from "react-native-sse";

// @ts-ignore
global.EventSource = eventsource;

// Offer TypeScript type definitions for collections
interface TypedPocketBase extends PocketBase {
  collection(idOrName: string): RecordService; // default fallback for any other collection
  collection(idOrName: "messages"): RecordService<Message>;
  collection(idOrName: "users"): RecordService<User>;
}

// Initialize PocketBase with EventSource
export const pb = new PocketBase("http://127.0.0.1:8090") as TypedPocketBase;

// Get current user data
export const useAuth = () => {
  return pb.authStore.record;
};

// Login function
export const login = async (
  email: string,
  password: string
): Promise<RecordAuthResponse<User> | null> => {
  try {
    const authData = await pb
      .collection("users")
      .authWithPassword(email, password);
    return authData;
  } catch (error) {
    console.error(error);
    return null;
  }
};

// Logout function
export const logout = () => {
  pb.authStore.clear();
};

// Register function
export const register = async (
  username: string,
  password: string,
  passwordConfirm: string
): Promise<RecordAuthResponse<User> | null> => {
  try {
    const user = await pb.collection("users").create({
      username,
      password,
      passwordConfirm,
    });
    if (!user) throw new Error("Failed to create account");
    const authData = await login(username, password);

    return authData;
  } catch (error) {
    console.error(error);
    return null;
  }
};
Auth UI
I won't be including the Auth UI since it's redundant, I can drop it if anyone's interested.
Public/Global Chatroom
I made a custom hook useMessages to make the app expandable, allowing you to build custom chatrooms easier. In later iterations I included [[React Query]] and optimistic updates, but I won't include that here.
useMessages
The following code sets up a real time connection to check for new records in the "messages" collection and modify our local state accordingly. The filter is there to stop users from seeing messages meant for other users. This was also covered in the API Rules section.
import { useState, useEffect } from "react";
import { Message } from "@/types";
import { pb } from "@/lib/pocketbase";

export function useMessages(users?: {
  currentUserId: string;
  otherUserId: string;
}) {
  const [messages, setMessages] = useState<Message[]>([]);

  useEffect(() => {
    const filter = users
      ? `user = "${users?.currentUserId}" && receiver = "${users?.otherUserId}" || user = "${users?.otherUserId}" && receiver = "${users?.currentUserId}"`
      : "receiver = null";

    const fetchMessages = async () => {
      const resultList = await pb.collection("messages").getList(1, 50, {
        sort: "-created",
        expand: "user",
        filter,
      });
      setMessages(resultList.items);
    };

    fetchMessages();

    pb.collection("messages").subscribe(
      "*",
      (e) => {
        if (e.action === "create") {
          setMessages((prevMessages) => [e.record, ...prevMessages]);
        }
        if (e.action === "update") {
          setMessages((prevMessages) =>
            prevMessages.map((msg) => (msg.id === e.record.id ? e.record : msg))
          );
        }
        if (e.action === "delete") {
          setMessages((prevMessages) =>
            prevMessages.filter((msg) => msg.id !== e.record.id)
          );
        }
      },
      {
        expand: "user",
        filter,
      }
    );

    return () => {
      pb.collection("messages").unsubscribe();
    };
  }, [users?.currentUserId, users?.otherUserId]);

  return messages;
}
PublicChat
The MessageList component displays the messages in a pretty way, and MessageInput will set the content of the message and send it.
import { MessageInput } from "@/components/chat/MessageInput";
import { MessageList } from "@/components/chat/MessageList";
import View from "@/components/ui/View";
import { useMessages } from "@/hooks/useMessages";
import { useAuth, pb } from "@/lib/pocketbase";
import { Redirect } from "expo-router";
import { useState } from "react";

export default function PublicChat() {
  const auth = useAuth();
  if (!auth) return <Redirect href={"/auth/signin"} />;

  const [newMessage, setNewMessage] = useState("");
  const currentUser = useAuth();
  const messages = useMessages();

  const sendMessage = async () => {
    if (!newMessage.trim()) return;

    try {
      await pb.collection("messages").create({
        content: newMessage,
        sender: auth.id,
      });
      setNewMessage("");
    } catch (error) {
      console.error("Failed to send message", error);
    }
  };

  return (
    <View className={`flex-1 w-full p-4 dark:bg-gray-800`}>
      <MessageList messages={messages} currentUserId={currentUser?.id} />
      <MessageInput
        value={newMessage}
        onChangeText={setNewMessage}
        onSend={sendMessage}
      />
    </View>
  );
}
Conclusion
PocketBase is a very nice and simple yet powerful tool to use. I hope that I've successfully demonstrated how you can get started building your chat app with PocketBase. Feel free to send me your progress if you wish. Have a nice day!